When you want to print address labels or send a letter to a Contact, then you can use the doogiePIM special Multi-Labels and Letters facility. This facility enables you to print multiple copies of the same letter or label but with different data, in this case it would be names and addresses.
To begin you must first select and identify the Contacts you want to send your letter to. You can do this in the Contacts sections using the List View.
It is advisable to create a folder in the Contacts Navigator to hold your mailing list, then you can organize those Contacts specially.
The data source of the letters and labels can be taken from the contacts List View or from the result of a Database Search.
See Database Search for more information.
After identifying and producing a List View of source data, either from the Contacts section or the Search results, now you should prepare your letter and label.
The letter and label document template is a formatted file document in DON format (doogiePIM Document) which can be edited in the doNotes Editor.
See Note Editor or doNotes for more information.
The document you create must contain special field markers so doogiePIM knows where to place the record data.
See Inserting Database Field Markers for more information.
Click on the icon in toolbar above the List View,
![]() (some toolbars have a further menu)
(some toolbars have a further menu)
To Start Multi-Mailing
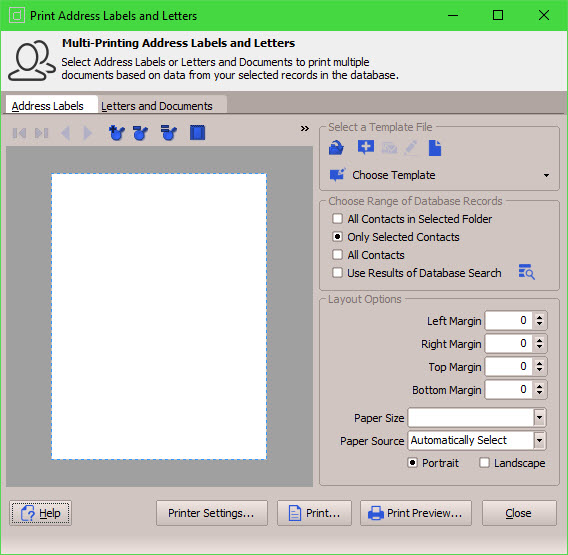
Choose from the main menu "File/Address Labels and Letters". This will launch the following screen:

Click on the tabs under the header graphic to switch between the label and the letter.
![]()
When you click on each tab, the printer settings, template file and layout options change accordingly.
Select the template document you created by using the icons on the right hand side:
Adjusting Margins and Orientation of the Page
The preview area on the left shows a guide to what the template looks like and takes into account the layout margins and orientation from the settings on the right.
Use the Layout Options to adjust margins and orientation.
Choose the Range of Records
You must choose where the source of the data comes from:
All Contacts in Selected Folder
This will use all the Contacts records that are shown in the Contacts section in the selected Navigator folder.
Only Selected Contacts
Same as above but only for Contacts that are selected. Use this if you only want a single Contact.
All Contacts
Use with caution. This will use every Contact record in your database.
Use Result of Database Search
This will use all the records shown in the result list of the Database Search window. Not all results are able to be used. The results can only be used if you search or query for Contacts.
After all this is done, click on Print to send the output straight to the printer or click on Print Preview for a visual confirmation of all the pages before printing is committed.
Related Topics
Inserting Database Field Markers